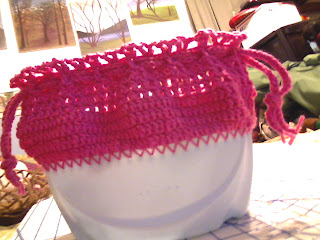
Many years ago I found instructions in a magazine for a crocheted little girl's purse using Joy dish washing liquid bottle. The bottom part had to be cut off and have holes pierced all around the edge. Then yarn was used to make the upper part using double crochet stitches and crocheted strings were used as closure at the top. It was not only a purse, but a small baby cradle for a little doll. all you had to do was fold the upper crocheted part over the plastic part, covering it into looking like a baby basinette for a baby doll. I recently got an empty Suavitel softener bottle and it looked so beautiful and blue that I decided to make another one now for my grand daughter.
I marked and cut the bottle using an exacto knife and scissors to get the bottom ready and got carried away with the leftover pieces for other future projects I have in mind--a dragonfly, two butterflies to be used as necklaces(information will come later) and even some parts to be used with a dragon and even earrings. I then used an awl to pierce holes all around the edge 3/8 of an inch away from the edge and with 3/8 of an inch between holes, I then intended to start the crochet part but realized I had to prepare further the edge before I could use a crochet needle. I used a large upholstery needle to "bind" the edge with a spiral stitch (in and out with the needle in a clockwise direction). I then did the same stitch in the opposite direction(counterclockwise) and finished the whole thing by looping the yarn over the top of the stitches by inserting the needle as shown under the two stitches as they touch. This procedure leaves a loop between stitches that can be used to crochet the top, without having to insert the crochet needle into the pierced holes, which would enlarge the holes and make them look ugly. Crochet double crochet stitches all around until the desired length is attained. Remember the top part has to be able to cover the bottom part when turned down. Crochet single crochet strings to insert at the top to close it. You may add tassels to the strings. Strings should be inserted through the same spaces but in opposing directions so that they can be pulled from opposite sides to close. I soon realized that since the Suavitel bottle was so big, this might end up being my purse and I will add crocheted flowers on the plastic bottom to make it better!!
Start two double crochet stitches in each space for four rounds, then one double crochet and one chain skip a double crochet and double crochet in next one all around for three rounds, then one double crochet, chain two and kip one double crochet and double crochet in next one for one round and the last row one double crochet chain two and another double crochet in each double crochet for one round and tie off.
For the two ties, chain until it equals the edge of top with about ten inches more, then chain on each chain for second row to make a stronger chain and insert through larger holes in second to last row at top and tie off at the side(the long side...do the same thing with the other tie in the opposite direction as shown.
There is a closeup that shows how the strings are inserted, besides the the overall look of the strings completely inserted. There is a picture showing the purse fully closed. I decided to crochet a bottom with a light brown yarn to simulate a trellis on which to attach some crocheted flowers in addition to the simple way i had done the small ones before. I crocheted a chain with 13 stitches and then single crocheted all around the chain using three single crochet stitches in the first and the last stitch of the chain to round the ends. The second row of single crochets had two single crochets on the first and third single crochets in the end chain. I then did double crochets on each single crochet, but on the rounded ends I had two double crochets with three double crochets in the middle of the rounded ends. The second double crochet row had two double crochets, chain 5, skip two double crochet and then two double crochets in next one, but have four spaces of skipping only one double crochet in each rounded end for a total of 19 pairs of double crochets; The next row, slip stitch on two chains on the five chain loop and single crochet in the third chain or the middle of the chain five, chain nine and single crochet in the third or middle of the next chain five, continue around until until you finish the round with a total of 19 loops of chain nine. Slip stitch to the middle of the chain nine and single crochet in the fifth chain, chain 12 and go all around. then slip stictch to the middle of the chain 12 and single crochet in the middle and chain 13 and continue that round and then add a last one using the sme chain 13 all around. On last row, slip stitch in the middle chain of the 13 chain, single crochet and chain 6, single crochet in the middle of the next chain 13 and repeat till the end. Using a large quilting needle and a long piece of yarn connect with a slip stitch the chain 6 to the to the Vshape stitches that were done on the puched holes to hold the bottom of the crocheted bottom to the crocheted top.
Tuesday, August 7, 2012
Subscribe to:
Comments (Atom)


